


Nestjs.com introduces Nest as a progressive Node.js framework for building efficient, reliable and scalable server-side applications.
Table of Contents
- Introduction
- Abbreviations Used
- Benefits of Using Nest
- Programming Language
- Architecture
- Engine
- Platform
- Prerequisites
- Setup
- Nest Project Modes
- Nest CLI Usage
- Basic Nest Commands
- Some Conventions Used in Nest
- What’s Next in this Series of Nest tutorials?
- About Me ( Dev_Siele )
Introduction
Nest is an MIT-licensed open-source framework for building well structured backend/server-side applications. It was created by Kamil Mysliwiec and currently has a growing user-base and community of backers. It is exploding both in popularity and adoption, and has 42.3K+ stars on GitHub . Keep up with Nest on Twitter.
The official introduction of Nest on docs.nestjs.com is concise, but also complete and on point; and I do not intend to water it down here so please check it out.
One thing I feel I must mention though is that the official Nest documentation is quite elaborate and easily digestible so you should always make constant reference to it in order to expedite your Nest mastery journey.
Abbreviations Used
| Acronym | Full Version |
| OOP | Object Oriented Programming |
| HTTP | HyperText Transfer Protocol |
| REST | Representational State Transfer |
| API | Application Programming Interface |
| MVC | Model View Controller |
| SSR | Server-Side Rendered/Rendering |
| RPC | Remote Procedure Call |
| CLI | Command Line Interface |
| CRUD | Create, Read, Update, Delete |
Benefits of Using Nest
The following list of Nest’s benefits is obviously non-exhaustive so kindly add any others you may think of in the comments section below.
- Nest is strong on the SOLID principles of software engineering and naturally gets us to accustom ourselves accordingly.
- Nest heavily adopts OOP which is evident in its extensive use of classes. This provides a clean architecture since related functionality and data is packaged together and exported as a class. From this we reap the benefits of OOP including inheritance, encapsulation, polymorphism, and abstraction.
- Nest is crafted to be modular by design thereby allowing you to build highly extensible and maintainable applications.
- Nest is based on Node.js and provides a myriad of functionalities thereby empowering you to use any core Node.js library within your applications as well as thousands of others available from the Node.js’ npm registry.
- Nest is extremely flexible and non-opinionated in whatever modules or libraries you may wish to add to your applications to enhance their capabilities. You also get to choose any preferred databases.
- Nest makes use of dependency injection which enables providers marked with the
@Injectable()decorator to be injected within, or passed as a parameter to, the constructor of the class where the provider is needed. This has the benefit of instantiating the provider class as a singleton that is available throughout the class in which it is injected. - As mentioned above, Nest makes heavy use of decorators (functions that can be used to enhance the functionalities and capabilities of other objects) and even allows you to create your own custom decorators.
- Nest is flexible on what you can build with its tooling including creation of REST API apps, MVC-style SSR apps, and it even has a dedicated GraphQL module.
- Nest supports the creation of applications that are fully aware of their execution contexts which gives you the immense power of being in control of the request/response cycle of any application type [ be it Nest HTTP server-based (http), microservices (rpc), websockets (ws), or GraphQL (graphql)]. With this access to the current execution context, you are able to build generic guards, filters, and interceptors that can work across a broad set of controllers, methods, and execution contexts.. “ their exact words ”.
Programming Language
Nest is built with TypeScript, however, it also supports vanilla JavaScript. For the JavaScript developers who have not yet attempted to work with TypeScript, I promise that you will probably get hooked the moment you try it; and especially as you start to wrap your head around TypeScript holistically.
Adding to that bold promise, Nest makes picking up TypeScript really intuitive; just as Angular does. Two free YouTube TypeScript playlists I highly recommend are No BS TS by Jack Herrington and TypeScript Fundamentals by TrueJS.
TypeScript, developed and supported by Microsoft, is a superset of JavaScript. Its motivation was to take the highly popular, dynamically-typed JavaScript and add static type-checking and other amazing features to it.
TypeScript is statically typed which means that you benefit from static analysis while developing with TypeScript. This is advantageous in that bugs are caught and highlighted as you code thereby compelling you to resolve them soon enough as it fails to compile if you don’t.
TypeScript is compiled to regular JavaScript; a process often referred to as transpilation. TypeScript has a compiler called tsc which Nest uses internally by default, and its files have an extension of “.ts”.
Architecture
Nest borrows greatly from Angular’s architecture so if you’ve dabbled with Angular in some capacity then you will feel right at home jumping on the Nest framework; albeit on the backend.
Nest out-of-box suggests and provides a clean, brilliant and modular architecture that is highly testable, scalable, loosely coupled, and easily maintainable as is indicated on its official introduction page.
Engine
The Nest framework is built on top of the highly popular JavaScript runtime engine for server-side applications, Node.js. It has a ton of functionalities that wrap around or abstract away some of the native Node.js core modules as well as those of other third party libraries or modules within the Node.js ecosystem (npm registry).
Platform
Nest is working towards becoming completely platform agnostic to enable developers to use any Node.js HTTP framework in the Node.js ecosystem (once their adapters are created). As of November 2021, it supports Express and Fastify but uses Express by default.
Prerequisites
Some prerequisites in terms of what you need to know before getting started with Nest include having a grasp of programming fundamentals especially in JavaScript, TypeScript, and Node.js and also in programming paradigms such as OOP.
To use Nest to build your next backend project, you must have Node.js (>= 10.13.0, except for v13 ) installed on your machine. To check whether you have a Node.js installation, whip up a terminal client and run node --version or node -v. And since npm automatically comes prepackaged with your Node.js installation, you may also run npm --version or npm -v to see its version.
Setup
Nest setup is as easy as running npm install -g @nestjs/cli which will install the Nest CLI globally on your machine. On success, this means that the nest command will be accessible from any directory of your choosing on your machine. Once that is complete you may run commands that begin with the keyword “nest”.
Nest Project Modes
Nest projects come in two flavours; standard mode and monorepo mode. The nest new command, however, creates a Nest project in standard mode by default.
Nest CLI Usage
nest new first-nestjs-project
cd first-nestjs-project
npm run start:dev
----The above 3 commands work as follows----
The 1st creates a new Nest project in standard mode with the name supplied (first-nestjs-project in this case) and places its files in a similarly named folder.
- While it runs, this command will require you to pick a package manager, either yarn or npm using up and down arrow keys then hit enter or return for it to continue.
Nest provides a detailed, self-explanatory log of what’s happening at each step as you’ll see in the image below.
An example is:
CREATE first-nestjs-project/.eslintrc.js (631 bytes)
which basically means that Nest created a file called “.eslintrc.js” of size 631 bytes within the first-nestjs-project directory.
The 2nd points or navigates your terminal into the specified project’s directory.
The 3rd spins up a development server for your newly created project in watch mode [to recompile it whenever a change in any of the project’s source files is detected] which you can then view in a browser on port 3000 i.e. localhost:3000. You should see the text “Hello World!”. If you want to stop the development server for any reason at any moment just run cmd+c or ctrl+c.
Since this process includes the compilation step, it produces a dist/ folder in the root directory of your application.
Basic Nest Commands
nest --version or
nest -v
prints the version of the Nest CLI on your machine.
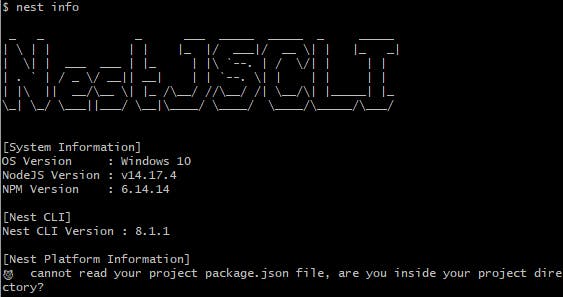
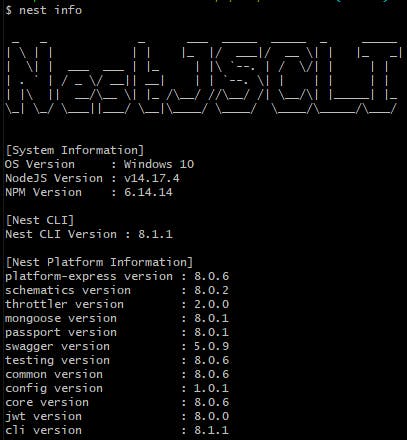
nest info or
nest i
displays some system, Node.js, npm, and project (if inside a Nest project) information.
The example below was ran from a random regular directory.
The example below was ran from within an existing Nest project directory.
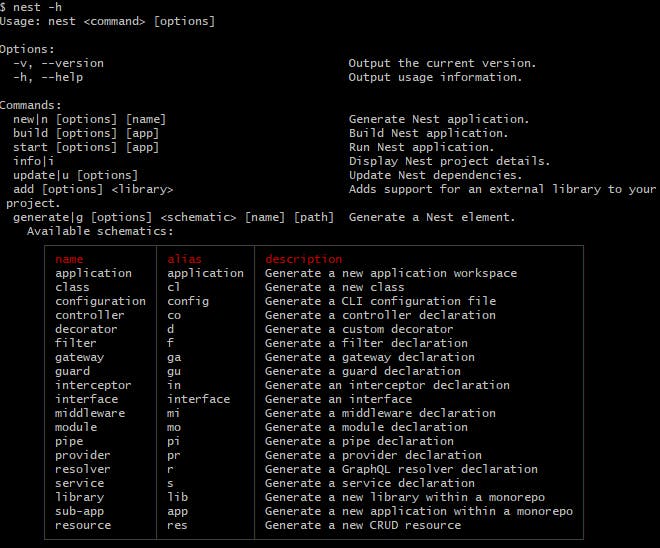
nest --help or
nest -h
outputs a list of useful commands in the Nest CLI. Try this on your own and you’ll see an output similar to the one below. From the image, also take note of the aliases (short forms) for each schematic. These come in handy when you wish to shorten your commands on the Nest CLI.
nest generate or
nest g
The general pattern for running the nest generate command is:nest generate|g [options] <schematic> [name] [path]
The above command will generate a Nest element for the specified schematic.
Nest schematics (as the image above shows) include: application, class, configuration, controller, decorator, filter, gateway, guard, interceptor, interface, middleware, module, pipe, provider, resolver, service, library, sub-app and resource.
An example command to generate a module called users is as follows:
nest generate module users or
nest g module users or
nest generate mo users or
nest g mo users
Some Conventions Used in Nest
Nest provides an opinionated and consistent methodology for structuring your projects and naming files.
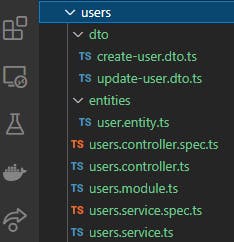
Let’s take a module called users for instance. Assuming that this module was created using the command:
nest generate resource users or
nest g resource users or
nest generate res users or
nest g res users
(which scaffolds a module as a CRUD template), folders and files within the users module would be named as follows:
These conventions were well thought out and I strongly advice that you stick to the tradition.
What’s Next in this Series of Nest tutorials?
In the succeeding tutorial we shall dissect the project generated by the nest new command and go over the file structure exploring the purposes of the generated directories and what each of the files does.
About Me ( Dev_Siele )
Some of my key passions are software development, knowledge transfer and collaboration.
I enjoy picking up skills in various technologies, building projects with them, and sharing my learning journey and experiences as I go.
I like delivering valuable content in an easily understandable manner.